Step 1: Locate the Account

At the top of the page, you’ll see the navigation path (breadcrumbs):
📍 US1 IBlüm Test Campus → Accounts → Account ID (US1IT2025085043)
- Use this path to confirm you are in the correct account.
- Click the earlier steps (e.g., Accounts) to go back.
Step 2: On the Financial Panels (bottom right of the page), click Prepare upcoming account statements.

Step 3: Prepare Account Statement – Page Overview

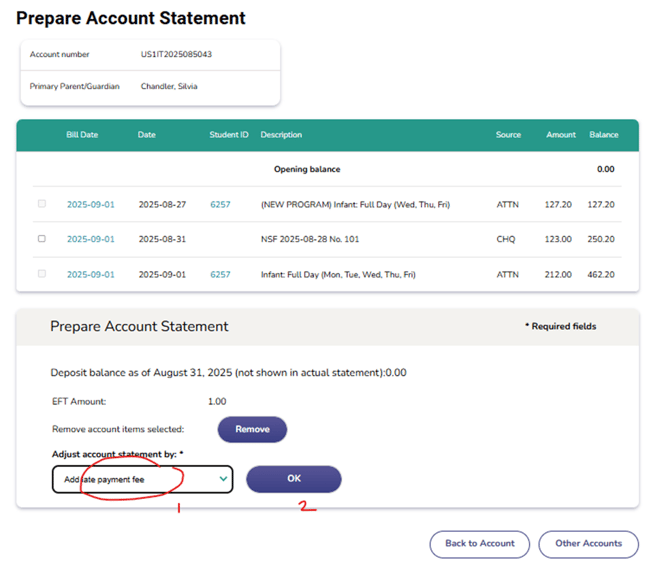
1. Header Information
- Account Number: Unique identifier for the family account (e.g., US1IT2025085043).
- Primary Parent/Guardian: Name of the responsible parent/guardian (e.g., Chandler, Silvia).
2. Billing Table (also known as Upcoming Account Statement
This section lists all billing related items (also known as Transactions) associated with the account for the weekly billing period. The items can be:
- Attendance charges
- Payments
- Credits
All of the above line items were either created automatically by the enrollment profile of the students or additionally manually created here. The collection of all transactions for this billing period are listed here, which becomes the UPCOMING account statement.
Columns:
- Check Box: If an item cannot be “removed”, the check box is grayed out. If an item can be removed the user can check the box and click on the Remove button. E.g. A cheque of 100.00 was entered by the user in a previous screen, and if that entry was made in error, then in this screen you can remove it.
- Bill Date: Date the bill is generated (e.g., 2025-09-01). Clicking on the hyperlink here takes you to the Account Statement
- Date: Actual transaction date.
- 2025-08-27 – ATTN charge – this is the date service started. The child enrolled on Wed. Aug-27, and is charged for 3 days Aug 27, 28, 29.
- 2025-08-29 – CHQ credit - line item is the date for the actual payment.
- 2025-09-01 – ATTN charge – This charge is an automated billing charge for upcoming week for the child – Sep 1, 2, 3, 4, 5.
IMPORTANT: Whenever an ATTENDANCE CHARGE is put in for a billing period, the charge is always put for the FIRST DAY the child attends for that billing period.
- Student ID: Identifier of the student (e.g., 6257). Clicking on the hyperlink here takes you to the Enrollment Profile for the student.
- Description: Details of the program or service billed (e.g., “Infant: Full Day (Wed, Thu, Fri)”). If there is a payment you will see the unique information there identifying the payment.
- Source: These are internal short codes that describe the actual billing item. It is a way for identifying the nature of the item, and have rules associated with that item. E.g. ATTN is a charge, CREDIT is a credit, CHQ for cheque, etc.
- Amount: Amount for the specific line item (if it is a credit it shows up in parentheses. E.g. (100.00) is a CHQ credit, E.g. 212.00 is an ATTN charge
- Balance: Running total after applying charges / credits.
- Entered by: The last column now displays the user who entered each transaction. Historical entries will show up as "? Unspecified". Hover over the initials to view the full name, role, date, and time of entry.

Example Entries:
- 127.20 for (NEW PROGRAM) Infant: Full Day (Wed, Thu, Fri) – indicating the child with ID 6257 started in the middle of the week, Wed Aug-27 and was charged for 3 days (the previous week)
- 212.00 for Infant: Full Day (Mon, Tue, Wed, Thu, Fri). - indicating the child with ID 6257 will continue in the new week starting Sep-01-2025 and is charged a full week fee for 212.00.
- (100.00) a cheque payment for this amount – indicates a payment from the payment by Cheque No. 132
- Cumulative balance: 239.20.
3. Prepare Account Statement Section
This section allows staff to finalize adjustments before generating the statement.
- Deposit Balance: Shows balance as of the last day of the prior month (e.g., August 31, 2025). IMPORTANT: The deposit is an amount that is held as a reserve for the parent, and this amount is not part of the running balance.
- EFT Amount: Displays any Electronic Fund Transfer amount recorded (e.g., 1.00). A non zero amount indicates, the parent has signed up for EFT withdrawal.
- Remove Account Items Selected: Button to exclude selected removable entries (manually entered) from the account statement.
- Adjust Account Statement By: Dropdown menu to choose adjustment options.

The above options are only available at the system administrator level. For the Supervisor, the following options are available:

Payments
- Record a NSF cheque
Use this when a cheque is returned due to insufficient funds. This will record the failed payment in the account. In addition, it will automatically add an NSF Fee for the account based on the amount configured.- Select the NSF or bounced cheque from the Cheque drop down box. Only cheque payments that have been deposited are listed.

- Once a cheque is selected, click the Continue button to record the fee adjustment to the account. This will also bring you back to the Prepare Account Statement page.

- Select the NSF or bounced cheque from the Cheque drop down box. Only cheque payments that have been deposited are listed.
-
- An NSF fee of 50.00 is charged.
- As well the original chq amount of 123.00 is reversed.
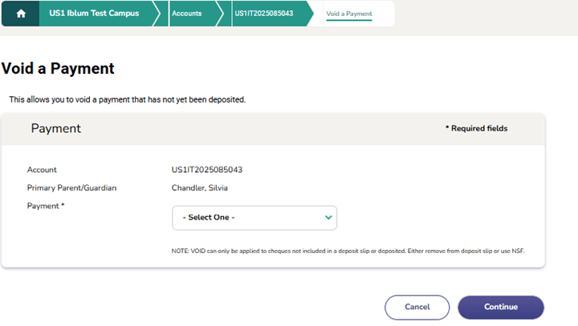
- Void a payment
Select this option to cancel a payment that was entered by mistake.- A payment that has not been deposited yet and
-
- The payment is in the past (i.e.) one cannot use the remove payment option on this payment anymore
- The payment is in the past (i.e.) one cannot use the remove payment option on this payment anymore
- Reassign a payment
Use this to assign a payment from one account to another (e.g., if the payment was incorrectly applied to the wrong family or child).- A payment that has been deposited or is a payment with a deposit date assigned
- A payment that has been deposited or is a payment with a deposit date assigned
- Cancel a credit card payment
Select this option to reverse a payment made via credit card.
- Cancel a direct deposit payment
Use this to cancel payments that were recorded as direct deposits.
- Cancel a wage payment
Choose this if a recorded wage payment needs to be cancelled.
Deposits
- Charge deposit
Use this to record when a deposit is charged to the account.- The deposit charge can be applied to a student or the account. Using the Student/Account drop down box, select the student/account of the primary parent that the deposit charge will be applied to.
- Set the transaction date by using the Transaction date drop down boxes.
- Using the Account statement date radio buttons, the deposit charge can be applied to the next account statement, a custom date or the transaction date. If the Custom radio button is selected, set the custom date by using the custom date drop down boxes. If the Custom or Transaction Date radio button is selected, the transaction date or the custom date defined must be made towards the next or future billing periods.
- Enter the deposit charge amount in the Amount field.
- If you have more deposit charges to enter to this account, check the Add more charges to this account checkbox.
- Click the Continue button once done.
- If you selected to add more deposit charges to this account, it returns to this screen. Otherwise, it will bring you back to the Prepare Account Statement page.

- Release deposit
Select this to release a previously charged deposit back to the account.- Deposits released can be applied to a student or the account. Using the Student/Account drop down box, select the student/account of the primary parent that the deposit release will be applied to.
- Set the transaction date by using the Transaction date drop down boxes.
- Enter the deposit amount to be released in the Amount field. The deposit amount cannot be more than the total deposit withheld. Total deposit amount withheld is indicated in the Deposit available field.
- If you have more deposits to be released from this account, check the Release more deposits from this account checkbox.
- Click the Continue button once done.
- If you selected to release more deposits to this account, it returns to this screen. Otherwise, it will bring you back to the Prepare Account Statement page.

- Refund payment
Choose this when issuing a refund to the payer. Usually refunds are provided by cheques.- To issue a refund payment, enter the cheque number payable to the parent in the Cheque No. field.
- Enter the total amount to be refunded in the Amount field.
- If you have more refunds to enter to this account, check the Add more refunds to this account checkbox.
- Click the Continue button once done.
- If you selected to add more refunds to this account, it returns to this screen. Otherwise, it will bring you back to the Prepare Account Statement page.
- Stop refund payment
Use this to cancel a refund that was initiated but should not be processed.- Select the refund payment to be stopped from the Refund dropdown box.
- Once a payment is selected, click the Continue button to stop this refund.
- Clicking on continue will bring you back to the Prepare Account Statement page.
NOTE: A Stop Payment Fee is added to the account automatically when using this feature. This fee is the same amount as the NSF fee. You can cancel the Stop Payment transaction by deleting the Stop Payment Charge (same as NSF Charge). Deleting this charge will automatically reverse the stop payment transaction.
- Bad debt
Select this to enter a BAD DEBT amount. To close and disable a bad debt account in the iBlum portal, the total outstanding balance must be reduced to zero. To reduce the outstanding balance of a bad debt account to zero, select the bad debt fee adjustment in the fee adjustments drop down box shown. The Bad Debt module will automatically calculate the amount needed to bring the total balance owing to zero. This fee adjustment option can only be selected if all deposits withheld in the bad debt account are released.- Select the bad debt option from the Prepare Account statement page.
- Once on the bad debt page, enter the reason for the bad debt.
- Clicking on Continue button will bring you back to the Prepare Account Statement page and the bad debt entry will look like below

- Reverse bad debt
Use this if a previously marked bad debt is later collected or needs correction or to activate an account for a returning parent.- Select the reverse bad debt option from the Prepare Account statement page.
- Once on the reverse bad debt page, enter the reason for reversing the bad debt.
- Clicking on Continue button will bring you back to the Prepare Account Statement page and the reversed bad debt entry will look like below.

Charges
- Add a miscellaneous charge
Record any extra charge not covered by standard categories (e.g., supplies, late pickup fee).- The miscellaneous charge can be applied to a student or the account. Using the Student/Account drop down box, select the student/account of the primary parent that the miscellaneous charge will be applied to.
- Set the transaction date by using the Transaction date drop down boxes.
- Using the Account statement date radio buttons, the miscellaneous charge can be applied to the next account statement, a custom date or a transaction date. If the Custom radio button is selected, set the custom date by using the custom date drop down boxes. If the Custom or Transaction Date radio button is selected, the transaction date or the custom date defined must be made towards the next or future billing periods.
- Enter the miscellaneous charge amount in the Amount field.
- If applicable, enter a description in the Description textbox.
- If you have more miscellaneous charges to enter to this account, check the Add more charges to this account checkbox.
- Click the Continue button once done.
- If you selected to add more miscellaneous charges to this account, it returns to this screen. Otherwise, it will bring you back to the Prepare Account Statement page.


If a charge has been entered in error, it can be removed by selecting the box and clicking on REMOVE button.
IMPORTANT: As a rule, all Manual Entries can be deleted as long as the activity is completed before the upcoming account statement is FINALIZED. The finalization of an account statement is an automated process, and is usually configured to finalize weekly, since account statements are generated on a weekly basis.
- Add a miscellaneous credit
Apply a credit to the account outside of regular payments (e.g., goodwill adjustment).- The miscellaneous credit can be applied to a student or the account. Using the Student/Account drop down box, select the student/account of the primary parent that the miscellaneous credit will be applied to.
- Set the transaction date by using the Transaction date drop down boxes.
- Using the Account statement date radio buttons, the miscellaneous credit can be applied to the next account statement, a custom date or a transaction date. If the custom radio button is selected, set the custom date by using the custom date drop down boxes. If the Custom or Transaction Date radio button is selected, the transaction date or the custom date defined must be made towards the next or future billing periods.
- Enter the miscellaneous credit amount in the Amount field.
- If applicable, enter a description in the Description textbox.
- If you have more miscellaneous credits to enter to this account, check the Add more charges to this account checkbox.
- Click the Continue button once done.
- If you selected to add more miscellaneous credits to this account, it returns to this screen. Otherwise, it will bring you back to the Prepare Account Statement page.

Add a credit is the exact opposite of Add a Charge and serve to cancel or nullify a charge. It is very IMPORTANT to distinguish between “NSF-ing A PAYMENT” vs. “ADDING A CREDIT” which can be confusing to a new administrator.
Adding a Credit is effectively nullifying a charge for a family, whereas NSF-ing a payment is cancelling a payment, the charge remains effective.
- Add late payment fee
Select this to apply a penalty for overdue payments.
The penalty is a configurable amount that is configured by the system administrator and automatically applies a fixed amount.

The late payment fee is entered into the list of transactions for the account.
Action Buttons:
- OK: Apply an adjustment. IMPORTANT: An administrator can apply any number of MANUAL ADJUSTMENTS to an Account Statement.
- Back to Account: Return to the account overview.
- Other Accounts: Navigate to different family accounts.
Step-by-Step Process
- Review Charges
- Check each row under the billing table.
- Verify service descriptions, dates, and amounts.
- Select Charges (Optional)
- Use the checkbox beside a line item to select it.
- Click Remove if you need to exclude the charge.
- Review Balances
- Confirm the Balance column matches expected totals.
- Check Deposit Balance and EFT Amount.
- Apply Adjustments
- Use the dropdown under Adjust account statement by to apply specific changes.
- Finalize Statement
- Click OK to generate the updated account statement.
- Use navigation buttons (Back to Account or Other Accounts) as needed.
NOTE
- Always verify dates and program descriptions before finalizing.
- Double-check the Balance after adjustments.
- Ensure EFT Amounts are accurately reflected.
- Use Remove cautiously - removed charges will not appear in the final statement.
✅ Best Practices
- Always confirm you are in the correct account before making changes.
- Keep parent contact details up to date so that you can reach out to them in the future for any reason whatsoever
- Monitor balance and overdue amounts regularly and take steps proactively to make sure the family is never exceeding their outstanding balances.