Step 1: Log In
-
Log in to the portal using your Supervisor account.
Step 2: Navigate to Lesson Plan Management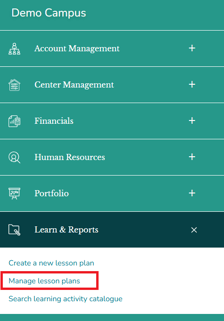
-
From the top menu, go to Learn & Reports.
-
Click on Manage Lesson Plans.
-
You will be navigated to the All Lesson Plans page.
Here, you can search by user or by program type if you want to filter the list.

Step 3: Select the Lesson Plan
-
Locate and select the lesson plan you want and on the right side click on the 'Upload' button
-
You will be navigated to the Edit Artifact page.


Step 4: Update Details
On the Edit Artifact page, you can adjust the following:
-
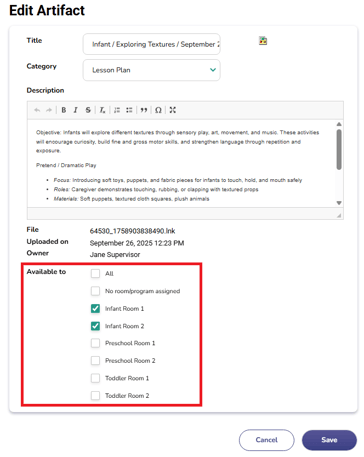
Title, Category and Description
- Edit the title and description if needed.
-
Leave the Category set to Lesson Plan.

-
Available To
-
Select the classrooms associated with the lesson plan.
-
Example: If the lesson plan is for an Infant Program, select the Infant Rooms.
-
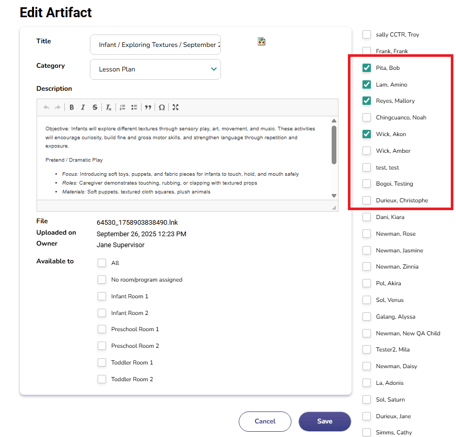
To restrict the lesson plan to specific students (such as for Enrichment Programs), check the box beside the individual student names.
-
Step 5: Save the Lesson Plan
-
Review all fields you updated. Click on the image icon to preview the lesson plan.

-
Once you are satisfied, click Save.
-
You will be navigated back to the Center Portfolio page.

Step 6: Confirm Upload
-
On the Center Portfolio page, check that the lesson plan appears at the top of the list.
-
This confirms that it has been successfully uploaded.

Step 7: Upload More Lesson Plans
-
To upload additional lesson plans, click on Lesson Plans again.
-
Repeat the same steps for each classroom or program.

Tip: Always double-check that the correct classrooms or students are selected to ensure lesson plans are only available to the intended audience.